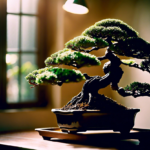
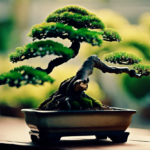
Step-by-step guide for repotting a juniper bonsai
When it comes to repotting a juniper bonsai, proper technique is essential to ensure the health and vitality of your plant. Here is a step-by-step guide to help you successfully repot your juniper bonsai:
-
Timing: The best time to repot a juniper bonsai is during the early spring before new growth begins. This allows the plant to recover quickly and minimize stress.
-
Preparation: Start by selecting a new pot that is slightly larger than the current one. Prepare the bonsai by gently removing it from its current pot and carefully loosening the roots.
-
Root Pruning: Trim the roots using sharp and clean bonsai shears. Remove any circling roots to encourage outward growth. This will help maintain the health of your juniper bonsai.
-
Soil: Choose a well-draining soil mix specifically designed for bonsai trees. A mix of Akadama, pumice, and lava rock is commonly used for juniper bonsai to provide good aeration and drainage.
-
Repotting: Place a layer of soil at the bottom of the new pot and position the juniper bonsai in the center. Fill the remaining space with soil, ensuring that the roots are completely covered.
-
Watering: After repotting, water the bonsai thoroughly to help settle the soil and hydrate the roots. Make sure that excess water can drain freely to prevent root rot.
-
Placement: Find a spot for your juniper bonsai that receives ample sunlight and good air circulation. Avoid placing it directly under intense sunlight to prevent scorching.
-
Aftercare: Keep a close eye on your juniper bonsai after repotting. Avoid fertilizing for the first few weeks to allow the roots to recover. Regularly monitor the soil moisture and adjust your watering schedule as needed.
By following these step-by-step instructions, you can successfully repot your juniper bonsai and promote its growth and overall health. Remember, patience and proper care are key to maintaining a thriving bonsai tree.
For more detailed information and tips on bonsai care, visit Bonsai Empire for expert guidance on cultivating and nurturing your bonsai plants.
Optimal Timing for Repotting a Juniper Bonsai
When it comes to repotting your juniper bonsai, timing is crucial for the overall health and vitality of the tree. The optimal time to repot a juniper bonsai is during the early spring months, just before the growing season begins. This period allows the tree to recover swiftly from any root disturbance and adapt to its new environment without causing stress.
Repotting during the spring also aligns with the natural growth cycle of juniper bonsai trees, promoting healthy root development and overall growth. Avoid repotting during the winter months when the tree is dormant, as it may hinder the recovery process and slow down the tree’s growth once the growing season commences.
It’s essential to observe the juniper bonsai closely for signs that indicate it’s time to repot, such as roots growing through the drainage holes, slow growth, or the soil drying out too quickly. These cues suggest that the tree has outgrown its current pot and requires repotting to thrive.
By repotting your juniper bonsai at the optimal time, you give it the best chance to establish a robust root system, absorb nutrients efficiently, and flourish throughout the growing season. Remember, timing is key when it comes to the health and longevity of your bonsai tree.
For more detailed information on caring for your juniper bonsai, you can visit Bonsai Empire for expert tips and advice.
Remember, the health of your juniper bonsai greatly depends on your repotting practices. Be sure to follow the optimal timing guidelines to ensure a thriving and healthy tree for years to come.
Choosing the Right Soil Mix for Repotting a Juniper Bonsai
When it comes to repotting a juniper bonsai, one of the critical aspects to consider is choosing the right soil mix. The soil mix plays a significant role in the overall health and development of your bonsai tree. Here are some key factors to keep in mind when selecting a soil mix for repotting your juniper bonsai:
1. Well-Draining Soil: Juniper bonsai trees require well-draining soil to prevent waterlogging, which can lead to root rot. A good soil mix will allow excess water to flow through easily, keeping the roots healthy and oxygenated.
2. Akadama: Akadama is a popular choice for bonsai soil mixes due to its excellent drainage and moisture retention properties. It is derived from volcanic soil and helps create a stable environment for the roots to thrive.
3. Pumice: Pumice is another essential component in bonsai soil mixes as it aids in aeration and prevents compaction. It is lightweight and porous, providing optimal conditions for root growth.
4. Lava Rock: Lava rock is often included in soil mixes to improve drainage and can help anchor the tree in the pot. It also adds stability to the soil structure while allowing air to reach the roots.
5. Organic Matter: Adding organic matter such as pine bark or peat moss can enhance the soil’s nutrient content and improve moisture retention. However, be mindful not to use too much organic matter as it can retain excess water.
6. Perlite: Perlite is a lightweight mineral that aids in aeration and drainage. It helps create air pockets in the soil mix, promoting root respiration and overall health.
7. Particle Size: When choosing a soil mix, opt for varying particle sizes to create a well-balanced environment for the roots. Fine particles help retain moisture, while larger particles improve drainage.
Selecting the right soil mix is crucial for the health and vitality of your juniper bonsai. It is recommended to repot your bonsai every two to three years to replenish the soil nutrients and ensure proper root development. By choosing a well-draining soil mix with the right components, you can promote healthy growth and longevity for your juniper bonsai.
For more information on soil mixes for bonsai trees, visit Bonsai Empire.
Pruning Techniques to Prepare a Juniper Bonsai for Repotting
Pruning plays a crucial role in preparing a juniper bonsai for repotting. Before beginning the repotting process, it is essential to trim and shape the tree properly to ensure its health and vitality. Here are some effective pruning techniques to help you prepare your juniper bonsai for repotting:
1. Branch Pruning: Start by inspecting the branches of your juniper bonsai and identifying any dead, damaged, or overgrown branches. Use sharp and clean bonsai pruning shears to carefully remove these unwanted branches. Make clean cuts at a 45-degree angle to promote faster healing.
2. Foliage Pruning: After trimming the branches, proceed with foliage pruning to thin out dense areas of foliage. This process allows better airflow and sunlight penetration, which are essential for the overall health of the bonsai tree. Trim excess foliage using sharp scissors, making sure to maintain the desired shape of the bonsai.
3. Apex Pruning: The apex of the juniper bonsai is crucial for maintaining its overall aesthetic appeal and balance. Carefully prune the apex to control the height and shape of the tree. Avoid cutting more than one-third of the total foliage at a time to prevent stressing the tree.
4. Wiring: In addition to pruning, consider using wiring techniques to shape the branches of your juniper bonsai. Wiring helps you achieve the desired bonsai style and structure. Be gentle when wiring and avoid wrapping the wire too tightly to prevent damage to the branches.
5. Styling: Before repotting, take this opportunity to refine the styling of your juniper bonsai. Consider the traditional bonsai styles such as formal upright, informal upright, slanting, and cascading. Choose a style that complements the natural characteristics of your juniper bonsai.
By incorporating these pruning techniques into your bonsai care routine, you can effectively prepare your juniper bonsai for repotting. Remember to assess the health and growth patterns of your bonsai regularly to determine the appropriate timing for repotting and ensure the long-term success of your bonsai tree.
For more in-depth information on bonsai pruning techniques and styling tips, visit Bonsai Empire for expert guidance and resources on cultivating healthy and beautiful bonsai trees.
Common Mistakes to Avoid When Repotting a Juniper Bonsai
Repotting a juniper bonsai is a crucial aspect of caring for these beautiful miniature trees. While the process is essential for the health and development of your bonsai, there are common mistakes that beginners and even experienced growers can make. Avoiding these pitfalls will help ensure the continued vitality and longevity of your juniper bonsai.
One common mistake to avoid when repotting a juniper bonsai is using the wrong soil mix. Junipers require well-draining soil to prevent waterlogged roots, which can lead to root rot and other health issues. Opt for a soil mix specifically designed for bonsai, or create your own blend using components like akadama, pumice, and lava rock. Avoid using regular garden soil, as it tends to retain too much water.
Another mistake is repotting at the wrong time. Junipers should typically be repotted during the spring before new growth appears. Repotting at the wrong time can shock the tree and hinder its growth for the rest of the year. Take note of the specific species of juniper you are working with, as some may have slightly different repotting schedules.
Pruning is a crucial step in preparing a juniper bonsai for repotting, but improper pruning techniques can harm the tree. Avoid over-pruning, especially right before repotting, as this can stress the juniper and slow down its recovery. Stick to light pruning to maintain the tree’s shape and health without causing undue stress.
One of the most common mistakes beginners make is repotting too frequently. Junipers generally only need to be repotted every two to three years, depending on their growth rate and age. Repotting too often can disrupt the tree’s root system and impede its overall development. Be patient and allow your juniper bonsai to settle into its pot before considering repotting.
Failing to water properly after repotting can spell disaster for a juniper bonsai. Newly repotted trees need careful attention to watering to help them recover from the shock of the process. Ensure the soil is consistently moist but not waterlogged, and monitor the tree closely for any signs of stress or dehydration.
By avoiding these common mistakes when repotting a juniper bonsai, you can help your tree thrive and grow beautifully for years to come.
For more information on caring for juniper bonsai trees, visit Bonsai Empire’s Juniper Bonsai Guide.
Conclusion
Once you have carefully followed the step-by-step guide for repotting a juniper bonsai, considered the optimal timing, selected the right soil mix, employed proper pruning techniques, and steered clear of common mistakes, your juniper bonsai will flourish with renewed vigor. By understanding the intricacies of repotting, you ensure the health and longevity of your bonsai tree. Remember, repotting is a crucial aspect of bonsai care that should not be overlooked. With thoughtful consideration and proper techniques, your juniper bonsai will continue to bring beauty and tranquility into your living space for years to come.